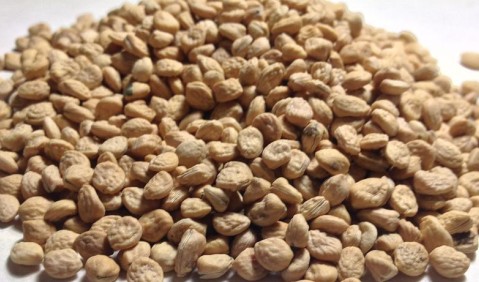
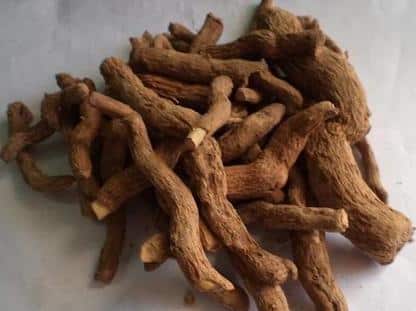
Sarpagandha Cultivation Information:
Introduction to Sarpagandha Cultivation:- What is Sarpagandha? Well, it is an important herbal or medicinal plant mostly grown in the hilly areas of Himalayan regions. This crop can be grown at an elevation of 1200 to 1300 meters. Sarpagandha can also be grown in lower ranges of the Eastern and Western Ghats and in the Andaman region. When it comes to planting description, Sarpagandha is an erect evergreen perennial shrub that can grow to the height of 75 cm to 100 cm. Sarpagandha plant roots can get 50 to 60 cm deep into the soil with tuberous branches having a diameter of 0.5 cm to 3 cm. Apart from medicinal uses, Sarpagandha can also be used in serpent wood, which is popular among woodcarving. This plant is being used in Indian Ayurveda for centuries. The parts used in the Sarpagandha plant are “Roots”. Grow this plant only when you have any marketing contract with herbal companies.
Distribution of Sarpagandha:- Sarpagandha plant grows in shady forests in India and it is an endangered species in many parts of India. So the export of the Sarpagandha plant is restricted from India. It is mostly distributed in the Himalaya regions, Uttaranchal, Uttar Pradesh, Jammu & Kashmir.
Scientific Name or Botanical Name of Sarpagandha Plant:- Rauvolfia serpentina.
Family Name of Sarpagandha Plant:- Apocynaceae.
Genus of Sarpagandha Plant:- Rauvolfia.
Health Benefits and Uses of Sarpagandha:-The following are some of the health benefits of Sarpagandha. Sarpagandha has many health benefits along with severe side effects. This root is used in herbal medicines for mild high blood pressure, nervousness, insomnia, and any mental disorders. This plant root is also used to treat snake and reptile bites, fever, constipation, feverish intestinal diseases, liver ailments, painful joints (rheumatism). However, you should not be using this without any medical professional advice or with any medical conditions.
Read this: Lemon Grass Farming Project Report.
Common names of Sarpagandha:
- Rauvolfia serpentina.
- Indian snakeroot.
- Devil pepper.
- Chandrabhaga.
- Chota chand.
- Serpentina root .
- Patalagondhi.
- Patalgaru.
- Chivan amelpodi.
- Paataala garuda.
- Asrel.
- Pule pandak.
- Harkaya.
- Chuvanna-vilpori.
- Chandrika.
Varieties (Cultivars) of Sarpagandha:
- Local collection from wild.
- S-1.
Climate Requirement for Sarpagandha Cultivation:- This crop thrives best in tropical to subtropical regions under frost-free conditions and required irrigation. Humid, warm climate, shade-loving conditions are best suited for the Sarpagandha plantation. It requires an annual rainfall of 300 to 500 mm. This crop thrives best in the regions where the temperature ranges from 10°C to 30°C.
Soil Requirement for Sarpagandha Cultivation:- Choosing the best soil is first priority for growing any medicinal plants. The suitable soil for the Sarpagandha crop is slightly acidic to neutral with medium to deep well-drained black soils rich in organic matter. To some extent, they can grow in sandy loam to laterites soils. When you are growing on a large scale (commercial cultivation), Clay loamy to silt loamy soils rich in humus is best suited. The ideal soil pH for growing Sarpagandha is about 4.7 to 6.5. Commercial growers of Sarpagandha should consider soil tests for finding the fertility of the soil. Any nutrient and micronutrient deficiencies should be filled during land or soil preparation.
Propagation, Seed Rate, and Sarpagandha Cultivation:- The Sarpagandha can be propagated through seeds, stem cuttings, root stumps, and root cuttings. Commercial growers should consider seed propagation for better yields. When seedlings are raised on nursery beds, it requires 6 to 7 kg of seed to cover 1 hectare. If stem cuttings are used, 100 kg of cuttings can cover 1-hectare land.
Seeds should be collected during Jan and Feb months and dried immediately under shade. Rub the seeds to remove plumpy matter.

Nursery Raising and Planting in Sarpagandha Cultivation:-
- Seed Propagation: Seed germination depends on seed quality and usually it is recommended to use heavy seeds for sowing. Freshly collected heavy seeds give more germination (about 65%) when compared to previously collected heavy seeds (about 30 to 40%). To cover a 1-hectare field, it requires 6 to 7 kg of seeds. You can soak the seeds in water for 24 hours before sowing.
- Stem Cutting Propagation: Hardwood stem cutting of Sarpagandha with 15 to 20 cm length are closely planted during June in the nursery beds. These beds should be maintained with continuous moisture conditions. After germination (sprouting) and developing out roots, these plants should be transplanted in the main field at 45 x 30 cm spacing.
- Root Cutting Propagation: 5 cm long root cuttings should be planted on nursery beds with well-decomposed farmyard manure, sand, and saw-dust. keep watering the beds to ensure continuous moistening status. Usually, these root cuttings sprout within 20 days after planting. These cuttings can be transplanted in the main field during the rainy season for better root establishment. The seedling’s row-to-row distance of 45 cm and plant-to-plant distance of 30 cm should be maintained. 100 kg root cuttings can cover the 1-hectare field.
- Root Stumps Propagation: Transplant the stem portion above the collar with 5 cm of roots directly in the field under irrigated conditions.
Land Preparation in Sarpagandha Cultivation:- Land should be prepared by giving deep ploughings for better root penetration and development. Remove any clods, weeds, rocks from the field.
Irrigation in Sarpagandha Cultivation:- Generally Sarpagandha is grown in regions where one can expect evenly distributed rainfall of above 150 cm. However, This crop can be grown as a rain-fed crop under sub-tropical conditions or irrigated crop. The irrigation frequency depends on the climate, soil type. It requires 16 to 17 irrigation throughout its growth period. The summer or dry season irrigation interval is once in 15 days whereas winter irrigation is once in 25 days.
Manures and Fertilizers in Sarpagandha Cultivation:- Usually, any herbal or medicinal are grown without any pesticides and chemical fertilizers. You must use natural organic manures such as well-decomposed farmyard manure (FMY) like cow dung, vermicompost, garden manures, or green manures. In case of any insect pests attack or diseases, bio-pesticides should be prepared from neem kernels, neem seeds and neem leaves, cow urine, dhatura, and Chitrakmool.
You can apply well rotten farmyard manure (FYM) at 25 to 30 tonnes/ha during land/soil preparation.
Intercultural Operations in Sarpagandha Cultivation:- In any orchard, giving proper and timely intercultural operations are essential.
- Weeding: Any agriculture or horticulture crop should be kept weed-free for healthy growth, high yields, and quality produce. In the Sarpagandha crop, 2 to 3 weedings and 2 hoeings should be carried out during the first year of the plantation when it is grown as the main crop. If it is grown as an inter-crop, then it requires 6 to 7 weedings should be carried out.
- Defloration in Sarpagandha Cultivation: Flowering and fruiting of crop start from 6 months after transplanting in the field. For better root growth and yield, carry out the defloration task. If you are growing the crop for seed collection then leave that specific area without defloration.
- Intercropping: Farmers can go for inter-crop for earning some income during the first year of the Sarpagandha plantation. Patchouli can be grown as an inter-crop with good irrigation. Sarpagandha is a shade loving plant, hence can be planted as inter-crop in other plantation crops
Pests and Diseases in Sarpagandha Cultivation:- Controlling pests and diseases is essential in any crop cultivation.
- Insect Pests: Root knots, Nematodes, Cockchafer grubs, and caterpillars are common insect pests found in Sarpagandha cultivation. For symptoms and control measures, contact your local horticulture/forest department.
- Diseases: Leaf spot and Alternaria tenuis are the most common diseases found in Sarpagandha cultivation. For symptoms and control measures of these diseases, talk to a horticulture professional.
- Note: Your local Horticulture is a good source for finding suitable solutions for controlling pests and diseases in Sarpagandha Cultivation.
Harvesting and Post-Harvesting in Sarpagandha Cultivation:- The Sarpagandha crop can come to maturity of roots in 2 to 3 years after planting in the field. Harvesting should be done by digging up the roots. Make sure to collect thin roots as well. Harvested roots should be cleaned and washed before cutting into 12 to 14 cm pieces for drying and storing. Generally, dry Sarpagandha roots will have 9 to 10% of moisture. Store these dried roots in gunny bags on a cool and dry shelf.

Yield in Sarpagandha Cultivation:- On average, Sarpagandha root yields vary from 1,500 to 2,000 kg/ha of dry weight under irrigated conditions. Yield may depend on soil type, climate, irrigation, and crop management practices.
In case if you are interested in this: How To Grow Organic Lettuce.
- How to Make Houseplants Bushy: Effective Tips and Ideas
- Innovative Strategies for Boosting Coconut Pollination and Yield
- Pollination Strategies for Maximum Pumpkin Yield
- The Complete Guide to Chicken Fattening: Strategies for Maximum Growth
- Natural Solutions for Tulip Problems: 100% Effective Remedies for Leaf and Bulb-Related Issues
- Revolutionizing Citrus Preservation: Towards a Healthier, Greener Future
- Natural Solutions for Peony Leaf and Flower Problems: 100% Effective Remedies
- Maximizing Profits with Avocado Contract Farming in India: A Comprehensive Guide
- Natural Solutions for Hydrangea Problems: 100% Effective Remedies for Leaf and Flowers
- The Ultimate Guide to Choosing the Perfect Foliage Friend: Bringing Life Indoors
- From Sunlight to Sustainability: 15 Ways to Use Solar Technology in Agriculture
- The Ultimate Guide to Dong Tao Chicken: Exploring from History to Raising
- The Eco-Friendly Makeover: How to Convert Your Unused Swimming Pool into a Fish Pond
- Mastering the Art of Delaware Chicken Farming: Essentials for Healthy Backyard Flocks
- 20 Best Homemade Fertilizers for Money Plant: DIY Recipes and Application Methods
- How to Craft a Comprehensive Free-Range Chicken Farming Business Plan
- Brighten Your Flock: Raising Easter Egger Chickens for Beauty and Bounty
- How to Optimize Your Poultry Egg Farm Business Plan with These Strategies
- Subsidy for Spirulina Cultivation: How Indian Government Schemes Encouraging Spirulina Farmers
- Ultimate Guide to Raising Dominique Chickens: Breeding, Feeding, Egg-Production, and Care
- Mastering the Art of Raising Jersey Giant Chickens: Care, Feeding, and More
- Ultimate Guide to Raising Legbar Chickens: Breeding, Farming Practices, Diet, Egg-Production
- How to Raise Welsummer Chickens: A Comprehensive Guide for Beginners
- How to Protect Indoor Plants in Winter: A Comprehensive Guide
- Ultimate Guide to Grow Bag Gardening: Tips, Tricks, and Planting Ideas for Urban Gardeners
- Guide to Lotus Cultivation: How to Propagate, Plant, Grow, Care, Cost, and Profit
- Agriculture Drone Subsidy Scheme: Government Kisan Subsidy, License, and How to Apply Online